This is the first of a two part mini series based on a game I played a few days ago in which my opponent (Black) challenged my Queen’s Gambit opening with the Albin Countergambit, which goes like this:
- d4 d5
- c4 e5
It’s an exciting way for Black to play because after just two moves two gambits have been offered, one by White (Queen’s Gambit) and one by Black (Albin Countergambit).
I’ll talk more about the Albin Countergambit in my next post. Today’s post is about how the game itself played out.
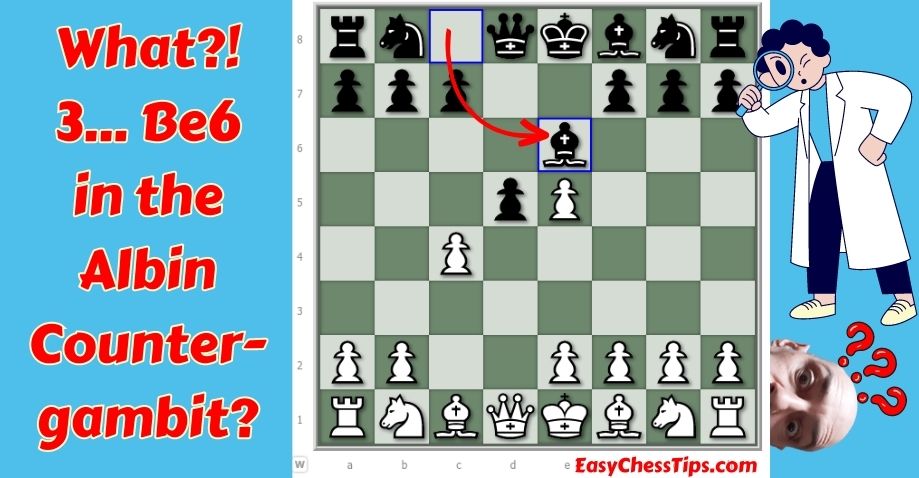
An Unexpected Move…
Suffice it to say that after 3. dxe5 I was expecting that Black would either advance his pawn to d4 or take the c4 pawn…
Instead, Black surprised me by moving his Bishop to e6. I smelt a rat, but I was also vaguely aware that White must beware of a trap or two in the Albin Countergambit and was not certain that Black was hoping to spring one…
Black’s Blunder is the First And The Worst!
As it turned out, Black was the first to blunder, in the seventh move.
I played 4. Nf3. I probably should have taken the d5 pawn, but I was willing to keep offering the gambit and exchange queens if Black accepted the challenge.
Instead, Black played 4. … c5, after which,
5.Nc3 d4
6.Ne4 Bxc4
7. b3 Qa5+?
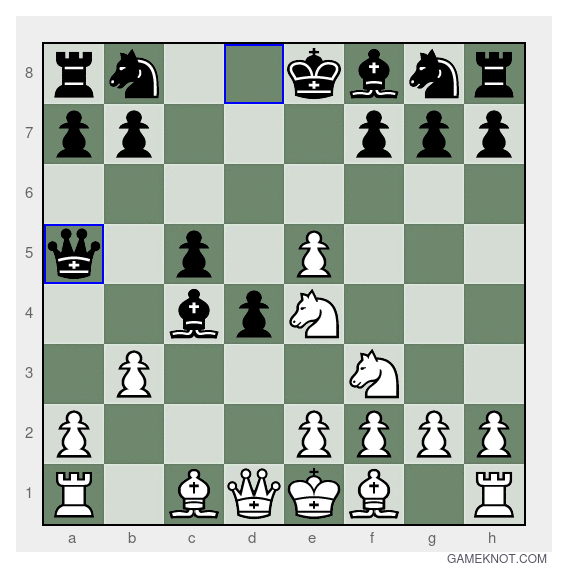
Moving the Queen to a5 was a blunder because after 8. Bd2 both Black’s Queen and Bishop are being attacked by lower value pieces, so one will fall.
After that, I also made a couple of blunders but managed to maintain my advantage and convert it into a win at the end. The video shows you how!
The Albin Countergambit with 3… Be6
Here’s the video of the game, edited and accelerated to 2x speed to keep the duration down to 15 minutes. (As blitz games go, this was quite a lengthy one, with 46 moves in all.)
The Moves
- d4 d5 2. c4 e5 3. dxe5 Be6 4. Nf3 c5 5. Nc3 d4 6. Ne4 Bxc4 7. b3 Qa5+ 8. Bd2 Qa6 9. bxc4 Qxc4 10. e3 d3 11. Rc1 Qxe4 12. Ng5 Qxe5 13. Qa4+ Nc6 14. f4 Qe7 15. Bxd3 h6 16. Ne4 Nf6 17. Rxc5 Nxe4 18. Re5 Nc5 19. Rxe7+ Bxe7 20. Qc2 Rd8 21. Bb5 O-O 22. Bxc6 Nd3+ 23. Ke2 bxc6 24. Rb1 c5 25. Rb3 Nb4 26. Bxb4 cxb4 27. Kf3 a5 28. Qc7 a4 29. Rb1 Bd6 30. Qc4 Kh8 31. g4 g5 32. h3 Rc8 33. Qe4 Rfe8 34. Qd4+ Kh7 35. Qxd6 gxf4 36. Qxf4 Re7 37. Qxb4 Rce8 38. e4 f5 39. gxf5 h5 40. Qxa4 Rd8 41. Rd1 Rc8 42. Rd7 Rc3+ 43. Kf4 Rg7 44. Rxg7+ Kh6 45. Rg6+ Kh7 46. Qd7+ 1-0
Video 2: The Albin Countergambit Trap White Must Avoid…
In my next video I’ll look at Gameknot’s post-game analysis and go over the Albin Countergambit and the trap that White must avoid…
Cheers!
David Hurley
#pubchessbluffer
Check out Gameknot and play for FREE at: https://gameknot.com/#hirohurl (Search for “hirohurl” when you join, and challenge me to a game!)